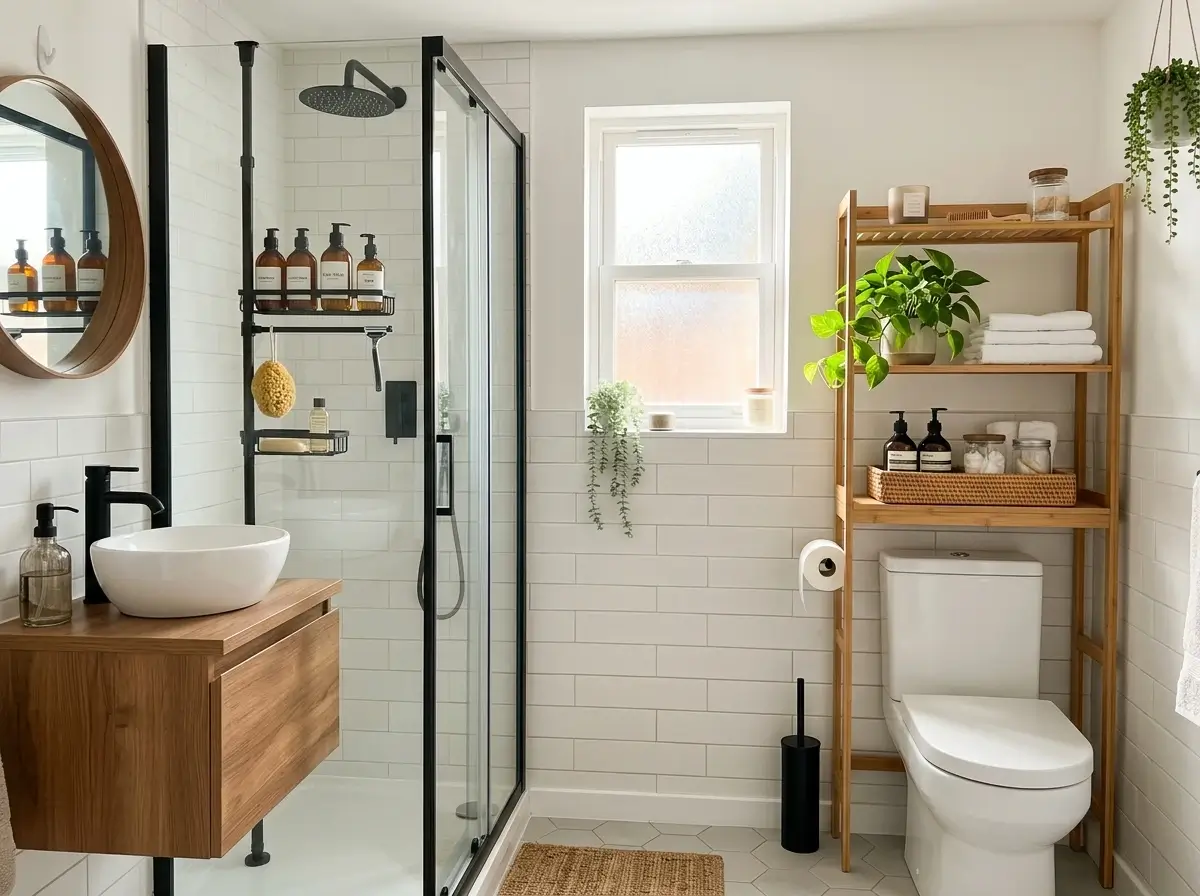
Tired of balancing your toothbrush on the edge of the sink? Tiny bathrooms are inherently frustrating, but drilling into tile or drywall to add shelves is a fast way to lose your security deposit.
Fortunately, you do not need power tools to create a highly functional, organized space. This guide covers the absolute best drill-free bathroom storage solutions designed specifically for renters.
We will break down exactly how to maximize your sink, shower, and floor footprint without causing permanent damage, helping you create a stress-free morning routine while keeping your landlord perfectly happy.
The Short Answer: How to Add Storage to a Rental Bathroom Without Drilling

To maximize space in a tiny rental bathroom without drilling, you must exploit vertical and unused areas by installing an over-the-toilet shelving unit, a tension rod caddy in the shower corner, and adhesive silicone organizers on your mirrors.
These drill-free bathroom storage methods prevent wall damage while instantly tripling your usable surface area for toiletries and towels.
When you are renting, preserving your security deposit is just as important as upgrading your daily morning routine.
Hacking a tiny floor plan requires shifting your perspective from the cramped floor space to the walls and vertical gaps.
By targeting the three highest-yield zones—the toilet footprint, the shower corner, and the flat mirror surface—you can implement highly effective drill-free bathroom storage systems that look professionally built-in but can be packed up and moved in minutes.
Let’s break down exactly how to conquer these three high-yield zones:
- Zone 1: The Airspace Above the Toilet The 24 to 30 inches of empty wall space directly above your toilet tank is the most underutilized real estate in any bathroom. Instead of leaving it blank, slide in a freestanding over-the-toilet storage ladder or rack.
- Pro-Tip for Renters: Look for units with an adjustable bottom crossbar. Standard rental toilets vary wildly in plumbing height, and you must ensure the rear crossbar completely clears the water supply valve jutting out from the wall.
- Weight Capacity: A solid bamboo or coated-steel tiered unit can easily hold 20 to 30 pounds of folded towels, extra toilet paper rolls, and decorative baskets without relying on a single drywall anchor.
- Zone 2: The Shower Corner (Floor-to-Ceiling) Tiny rental showers often lack built-in tile niches, leaving you to balance slippery shampoo bottles on a narrow tub ledge. The ultimate damage-free fix is a heavy-duty compression tension rod caddy.
- How it works: These adjustable metal poles wedge firmly between the tub floor (or outer rim) and the ceiling using a heavy-duty internal spring mechanism.
- The Primary Benefit: Because they rely strictly on vertical physical compression rather than surface adhesion or suction cups, they easily support 15+ pounds of heavy liter-sized pump bottles without randomly crashing down in the middle of the night.
- Zone 3: The Mirror Surface If your rental features a basic pedestal sink with absolutely zero counter space, your mirror glass is your best friend.
- Silicone Organizers: Utilize custom silicone caddies equipped with specialized grip technology (which requires zero foam tape or suction cups) to hold toothbrushes, razors, and small skincare tubes.
- Application & Removal: Simply clean the mirror with rubbing alcohol, peel the plastic backing, and press firmly. They reliably hold up to 5 pounds and peel off seamlessly like a window cling when your lease is up.
Before implementing any of these systems, it is crucial to measure your exact spatial clearances.
For instance, always measure the gap between the toilet tank lid and the flush button (if it’s a top-flush push model) to ensure the bottom shelf of your rack won’t block everyday access.
Likewise, measure your exact shower ceiling height; most standard tension rods extend from 56 inches up to 114 inches, but unusually vaulted bathroom ceilings might require an extension piece.
For a complete overview of reversible apartment upgrades, check out our full guide to safe rental bathroom renovations.
How do I deal with a lack of counter space in a small rental bathroom?
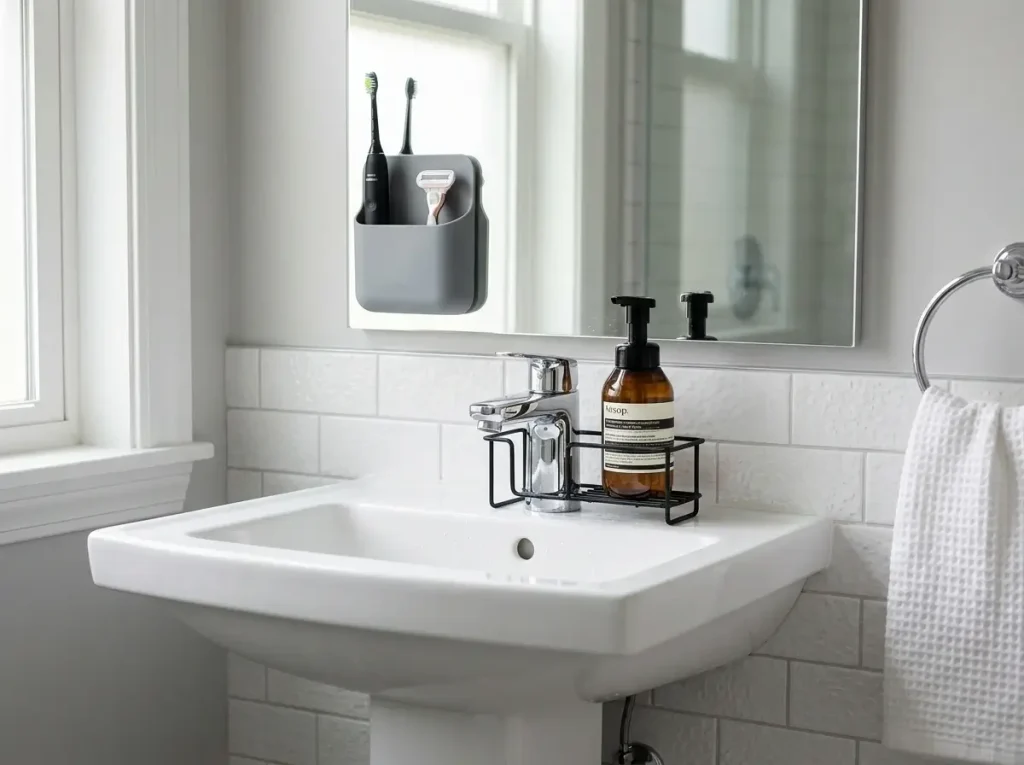
Pedestal sinks and wall-mounted basins are incredibly common in apartment floor plans because they visually open up a tight bathroom, making the floor plan feel slightly larger.
However, they sacrifice vital utility, often leaving you without a single square inch of usable flat space.
If you are constantly knocking your toothbrush into the sink basin or struggling to find a safe spot for your daily moisturizer, the secret is migrating your everyday grooming tools onto the immediate vertical planes—specifically the mirror glass and the tile backsplash.
To reclaim this lost counter space immediately, you must move your daily essentials to the wall using wall-mounted adhesive toothbrush holders, silicone stick-on organizers for razors, and over-the-faucet shelves.
Shifting these lightweight, frequently used items off the sink ledge clears the area instantly without relying on heavy, permanent hardware, making it an essential drill-free bathroom storage strategy.
When dealing with a zero-counter layout, here is the exact numbered sequence of upgrades you should implement to maximize utility:
- Harness Silicone Grip Technology on the Mirror If you have a flat, frameless mirror above your sink, you possess prime storage real estate. Avoid traditional suction cups; they inevitably lose their seal in humid environments and crash into the sink. Instead, opt for silicone stick-on organizers.
- The Science: These organizers utilize a proprietary silicone grip technology that bonds to glossy surfaces (like glass or perfectly smooth, glazed tile) via micro-suction, completely avoiding chemical adhesives.
- Weight Limits: High-quality silicone pockets can securely hold up to 5 pounds, making them robust enough for heavy sonic toothbrushes, metal safety razors, and full tubes of toothpaste.
- Removal Process: They peel off instantly from the corner with zero sticky residue left behind, leaving your rental mirror absolutely pristine.
- Deploy Water-Resistant Adhesive Strips on the Backsplash If you need a small acrylic shelf for skincare bottles or contact lens solutions, standard double-sided foam tape will fail the moment the room fills with hot shower steam. You must use adhesives specifically engineered for high-humidity environments.
- Surface Preparation: Always wipe the smooth tile with isopropyl alcohol before application to strip away invisible soap scum and natural oils that prevent strong adhesion.
- Capacity Check: Utilize specialized bathroom strips. For safety, always check the command strips weight limits to precisely match the adhesive strip to your shelf’s maximum load. Most water-resistant strips safely top out at 3 to 5 pounds per strip.
- Application Rules: Press the strip firmly against the tile for a minimum of 30 seconds, and you must wait a full 24 hours before placing any weight on the shelf. This curing period is non-negotiable in wet environments to allow the bond to set.
- Install an Over-the-Faucet Shelf If your mirror is situated too high or your backsplash consists of painted drywall that shouldn’t hold adhesive, an over-the-faucet caddy is a brilliant physical workaround. These small, lightweight metal or plastic trays feature a customized U-shaped cutout that slides directly over the neck of standard bathroom sink faucets.
- The Benefit: They rest on the porcelain base of the sink and clamp gently around the faucet hardware, requiring absolutely no adhesives, suction, or drilling.
- Ideal Use Case: This creates a stable, elevated platform perfect for keeping a foaming hand soap dispenser, a small bottle of hand lotion, and your rings secure right where you need them most.
Implementing this multi-tiered approach to drill-free bathroom storage around your sink area will immediately transform a frustrating pedestal basin into a highly functional grooming station.
Every daily essential remains within arm’s reach, while the actual sink basin stays completely uncluttered and easy to wipe down.
Over-the-toilet shelf vs. rolling utility cart: Which is better for tiny bathrooms?
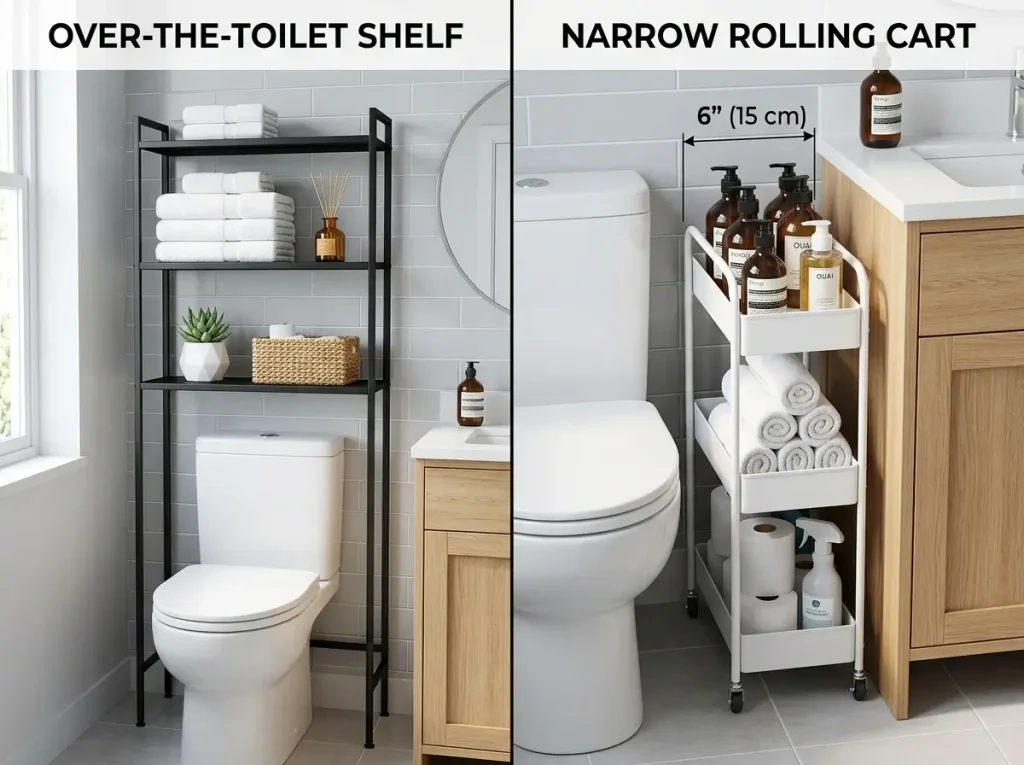
When upgrading a tight floor plan, renters usually narrow their large furniture choices down to two main contenders: the over-the-toilet shelving rack and the tiered rolling utility cart.
Choosing the right one dictates how effectively you maximize your drill-free bathroom storage without making the room feel like a claustrophobic storage closet.
The definitive answer comes down to exactly how much floor space you have available. An over-the-toilet shelf is best for maximizing vertical airspace in extremely tight layouts where floor space is virtually zero.
Conversely, a rolling utility cart is ideal if you have a minimum 6-inch narrow gap between the vanity and toilet and prefer movable access to heavy liquids.
Here is the exact breakdown to help you measure and choose the correct drill-free bathroom storage unit for your specific layout:
The Over-the-Toilet Shelf: Masters of Vertical Airspace
If your bathroom door grazes the toilet bowl when it opens, you cannot sacrifice a single inch of floor space. Over-the-toilet racks capitalize on the dead air above the tank. However, assembling one requires meticulous measurement of your rental’s existing plumbing.
- The Valve Trap: The bottom stabilizing crossbar of most freestanding racks sits about 6 to 8 inches off the floor. You must measure the wall behind your toilet to ensure this bar does not directly intersect with the water supply valve protruding from the wall.
- Lid Clearance: Ensure there are at least 2 to 3 inches of vertical clearance between the top of the toilet tank lid and the bottom of the lowest shelf. If it is too tight, you won’t be able to remove the heavy porcelain tank lid for basic plumbing troubleshooting (like fixing a running flapper).
- Best Use: Storing lightweight, bulky items like folded bath towels, spare toilet paper pyramids, and small decorative plants.
The Rolling Utility Cart: The Mobile Command Center
If you happen to have a sliver of space between your sink vanity and your toilet, a 3-tier metal rolling cart is an incredibly versatile option. Standard narrow carts are typically 5.5 to 7.5 inches wide.
- The Clearance Rule: According to standard bathroom clearance guidelines, you generally want to maintain adequate breathing room around fixtures for comfort and cleaning, but a slim rolling cart can neatly fill dead gaps while remaining entirely removable.
- Weight Distribution: Because these carts sit low to the ground on caster wheels, they boast a vastly superior center of gravity compared to tall, top-heavy shelving units.
- Best Use: Loading up heavy, liter-sized bottles of shampoo, massive jugs of body wash, and harsh cleaning chemicals that you want to keep easily accessible but out of the way.
The Direct Comparison
| Feature | Over-the-Toilet Shelf | Rolling Utility Cart (Slim) |
| Best Layout For… | Zero-floor-space, tight corners | Narrow gaps (6+ inches minimum) |
| Primary Advantage | Maximizes unused vertical volume | High mobility & easy access under sinks |
| Weight Distribution | ~20-30 lbs (can be top-heavy) | ~40-50+ lbs (safely bottom-heavy) |
| Installation Effort | Requires careful assembly & leveling | Usually snaps together in under 5 minutes |
| Ideal Stored Items | Towels, toilet paper, lightweight decor | Heavy liquids, cleaning supplies, cosmetics |
Before purchasing either piece of furniture, grab a tape measure. A miscalculated over-the-toilet shelf can completely block a top-flush button, while a rolling cart that is just a half-inch too wide will permanently scrape against your landlord’s vanity cabinet every time you pull it out.
Tension rod shelves vs. suction cup caddies: Which holds up better in the shower?
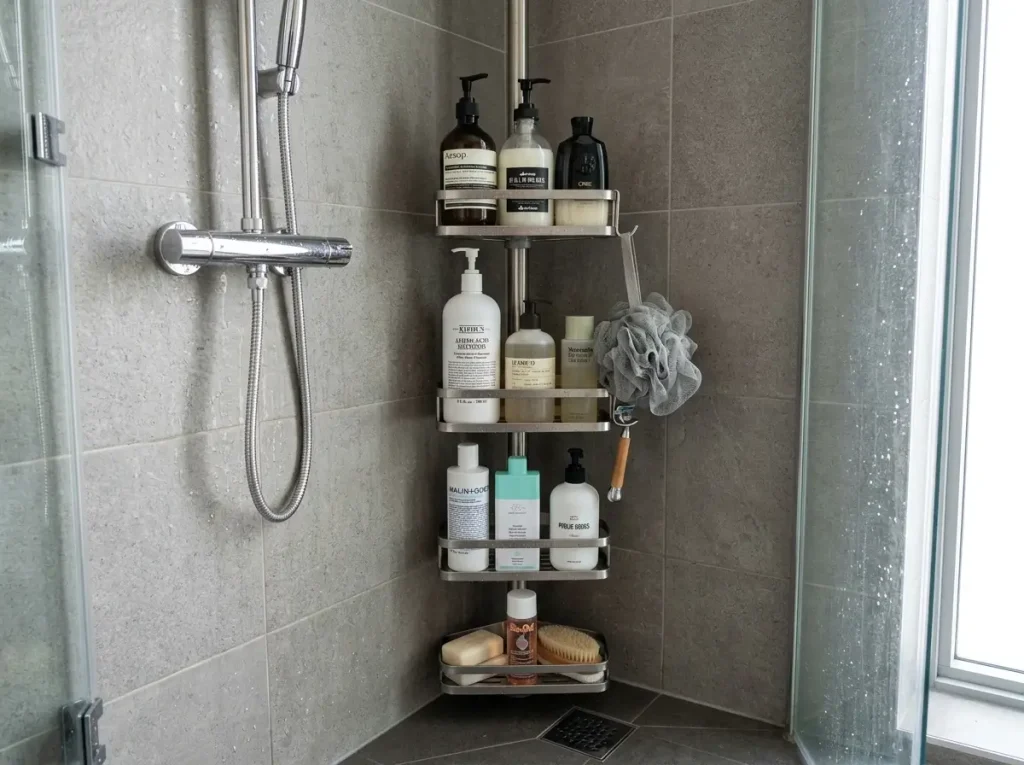
When evaluating shower-specific drill-free bathroom storage, the debate almost always comes down to tension rod shelves versus suction cup caddies.
If you want true reliability, tension rod shelves hold up significantly better for heavy shampoo bottles because they rely on floor-to-ceiling physical compression rather than surface grip.
Suction cup caddies, on the other hand, frequently fail and fall in the middle of the night due to uneven grout lines, porous textured tiles, and severe temperature fluctuations weakening their vacuum seal.
Let’s examine exactly why the physics of your shower environment dictates which system you should trust with your heavy, expensive hair care products.
The Flaws of Suction Cup Caddies
While they are inexpensive and incredibly easy to press onto a wall, suction cups are ultimately fighting a losing battle against the laws of physics. A suction cup requires a 100% airtight vacuum seal to remain attached to a vertical surface.
- The Material Problem: Suction cups only work reliably on perfectly smooth, non-porous surfaces like pristine glass, smooth mirrors, or high-gloss acrylic tub surrounds. If your rental shower has standard textured ceramic tile, natural stone, or even microscopic hard water etching, air will slowly leak into the cup, breaking the seal.
- The Grout Line Trap: If any part of the rubber cup overlaps a grout line—even by a millimeter—the seal is instantly compromised.
- The Temperature Variable: Hot, steamy showers cause the air trapped inside the suction cup to expand, while cold air causes it to contract. This constant daily expansion and contraction severely fatigues the rubber.
- Weight Limits: Even under absolutely perfect conditions, standard suction cup organizers are rarely rated for more than 3 pounds. A single liter of shampoo weighs roughly 2.2 pounds, meaning a basic duo of shampoo and conditioner will almost certainly exceed the structural limit, leading to a catastrophic crash.
The Superiority of Tension Rod Shelves
Tension rod caddies are the undisputed heavyweights of wet-environment drill-free bathroom storage.
Instead of relying on a fragile vacuum seal against a wet, soapy wall, these metal poles utilize a heavy-duty internal spring that wedges the unit vertically between two solid, parallel surfaces (usually the tub ledge and the ceiling, or the floor and the ceiling).
- Universal Compatibility: Because they push vertically against the floor and ceiling, the texture of your shower walls is completely irrelevant. They work flawlessly alongside rough slate stone, heavily grouted subway tile, or cheap fiberglass inserts.
- Massive Weight Capacity: A quality rust-resistant stainless steel or aluminum tension rod can effortlessly support 15+ pounds of shower gear. You can safely load them up with economy-sized pump bottles, heavy body scrubs, and multiple wet bath sponges without any fear of the unit collapsing.
- Space Maximization: They utilize the dead corner space of the shower, keeping bulky bottles completely out of your direct line of movement and freeing up the narrow tub ledge.
Direct Comparison: Shower Storage Reliability
| Feature | Tension Rod Shelves | Suction Cup Caddies |
| Primary Mechanism | Vertical physical compression (spring-loaded) | Airtight vacuum seal |
| Weight Capacity | 15+ pounds (safely holds multiple liter bottles) | Under 3 pounds (lightweight razors/sponges only) |
| Surface Compatibility | Universal (ignores wall texture entirely) | Strictly smooth glass or high-gloss tile |
| Vulnerability | Rust (if cheap, non-coated steel is used) | Temperature shifts, grout lines, porous tile |
| Reliability | Extremely High | Low to Moderate (frequent re-application needed) |
If you are investing in a system to organize a chaotic, cramped tub, bypass the suction cups for heavy liquids entirely. A tension rod is the safest, most durable investment to protect your rental’s tile while keeping your heavy bottles perfectly secure.
What are the best damage-free hooks for heavy wet towels?
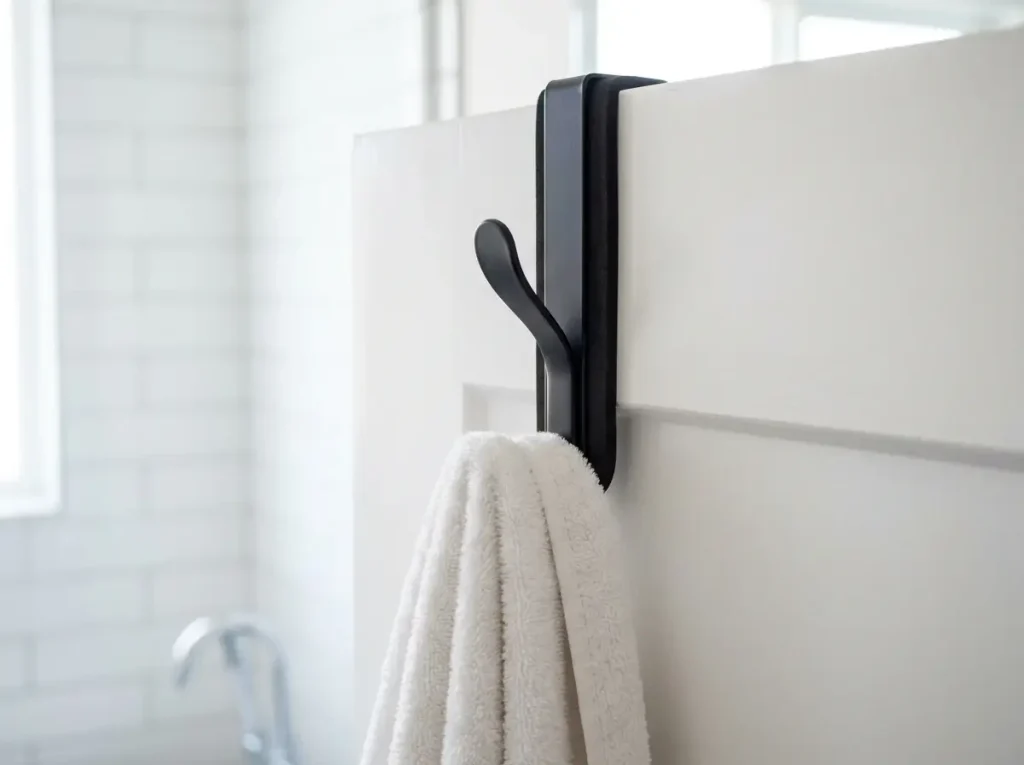
Managing wet towels is arguably the most common failure point for temporary apartment organization. A standard, high-quality dry bath sheet weighs approximately 1.5 pounds.
However, once that fabric is completely saturated with water after a long shower, that exact same towel can easily weigh up to 4 pounds.
If you try to hang a 4-pound wet towel on a basic plastic adhesive strip rated for only 2 pounds, it is inevitably going to crash to the floor.
When planning your drill-free bathroom storage, hanging heavy wet textiles requires special attention to both structural weight limits and the specific materials of your walls.
The most disastrous mistake renters make is sticking heavy-duty adhesive hooks directly onto standard painted drywall.
While the commercial adhesive on the back of the hook might be rated for 10 pounds, the paint bonded to the drywall paper underneath is not.
The sheer downward force of a wet towel will literally peel the latex paint and the top layer of drywall paper straight off the wall, leaving a massive gouge that guarantees a deduction from your security deposit.
To securely hold heavy wet towels without causing structural damage, rely on the following targeted solutions:
- Over-the-Door Hooks with EVA Foam Padding: This is the absolute safest and most reliable solution for heavy textiles. These metal brackets slide directly over the top of your bathroom door. Crucial detail: You must purchase brackets that feature EVA foam or felt padding on the inside of the metal clamp. Rental doors are often cheaply painted, and bare metal sliding repeatedly across the top edge will cause deep friction scratches. Because the weight is distributed structurally over the solid top of the door frame, these hooks can easily hold 10 to 15 pounds, accommodating multiple wet bath sheets simultaneously.
- Heavy-Duty Adhesive Hooks on Tile or Glass: If your door lacks the top clearance for a bracket, you must use specialized heavy-duty adhesive hooks explicitly rated for at least 5 to 7 pounds. The strict application rule: These must be applied solely to hard, non-porous surfaces such as glazed ceramic tile, the exterior of a glass shower door, or a high-gloss painted solid wood door frame. You must absolutely avoid applying them to matte-painted drywall.
- Over-the-Glass Shower Hangers: If your rental features a glass shower enclosure rather than a shower curtain, utilize double-sided stainless steel hooks that hang directly over the top edge of the glass pane. These require zero adhesive, utilize the immense structural strength of the tempered glass, and allow the towel to drip-dry directly into the shower pan. They represent an elite tier of drill-free bathroom storage because they are infinitely movable and leave zero residue.
- A Warning on Hollow-Core Doors: Many modern apartment complexes utilize hollow-core interior doors to save money. While an over-the-door hook distributes weight well, you should avoid hanging more than two completely soaked bath sheets on a single hollow-core door. Excessive, continuous weight pulling on the top edge can actually warp the thin wood veneer casing over time.
To ensure any adhesive hook reaches its maximum advertised weight capacity, surface preparation is mandatory.
You must vigorously scrub the tile or glass with isopropyl alcohol to remove invisible soap scum and natural skin oils.
Press the hook firmly against the surface for 30 to 60 seconds, and let the adhesive cure for a strict 24 hours before hanging your wet towel. Skipping this curing period will instantly slash the holding capacity in half.
Which “drill-free” bathroom products actually end up damaging drywall?
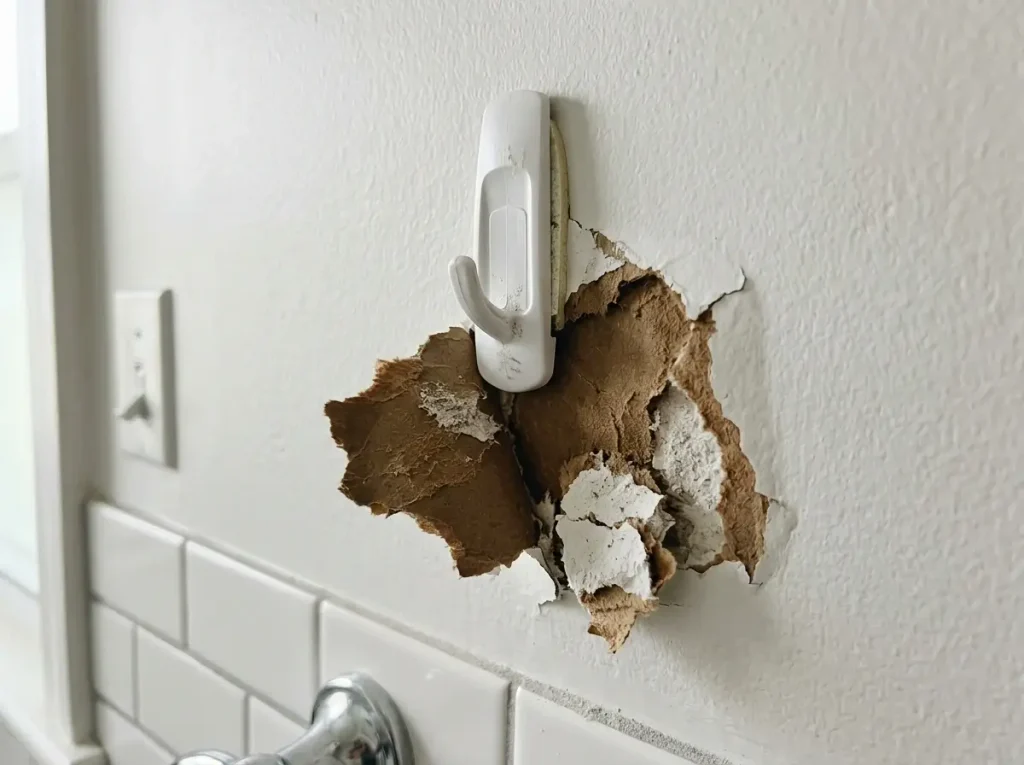
While the market is flooded with gadgets promising effortless organization, not all drill-free bathroom storage solutions are created equal.
The most devastating traps for renters are products that utilize industrial double-sided foam tape, heavy-duty suction mounts applied over painted surfaces, and cheap off-brand adhesive hooks.
These products frequently rip off the top layer of drywall paper and paint upon removal, guaranteeing a hefty deduction from your security deposit.
The core of the problem lies in the unique environmental chemistry of a bathroom. High humidity, daily steam, and constant temperature fluctuations physically alter the structural integrity of painted walls.
Over time, moisture penetrates microscopic pores in latex paint, slowly weakening the bond between the paint layer and the delicate paper face of the drywall underneath.
When you apply a heavy-duty adhesive to this compromised surface, the synthetic glue is often significantly stronger than the paint’s bond to the wall.
When moving day arrives and you attempt to pull the hook off, the adhesive holds firm, and the paint and drywall paper tear away instead.
To protect your walls and your wallet, you must learn to identify and avoid these three common “renter-friendly” culprits:
- Industrial Double-Sided Foam Tape (VHB): Many heavy floating shelves and bulky shower dispensers come packaged with thick, dark grey or black foam tape, often labeled as VHB (Very High Bond). This tape is essentially a liquid adhesive cured into a solid foam state. It is designed for permanent outdoor automotive or construction use, not for interior drywall. Never apply VHB tape to a painted wall. It will permanently bond to the drywall paper and require scraping, patching, and repainting to fix.
- Heavy-Duty “Vacuum” Suction Mounts on Paint: Some modern caddies utilize mechanical locking suction cups that create a massive vacuum seal when you twist a dial or flip a latch. While these are fantastic for glass and glazed tile, applying them to matte-painted drywall is a disaster waiting to happen. The intense mechanical vacuum pulls violently on the porous paint layer. Over a few weeks, the continuous suction will literally blister the paint right off the wall, leaving a perfectly round, bare circle of brown drywall paper exposed.
- Cheap Off-Brand Adhesive Hooks: While name-brand removable strips (like Command) utilize a patented stretch-release technology that breaks the adhesive bond cleanly, cheap online knock-offs often use standard, unformulated industrial glues. These glues do not stretch; they simply harden and cure over time. After six months in a steamy bathroom, they become essentially fused to the wall.
To keep your drill-free bathroom storage truly damage-free, adhere to a strict rule: only apply adhesives to non-porous surfaces like glass, mirrors, and glazed ceramic tile.
If you absolutely must apply an adhesive to drywall, only use trusted, name-brand stretch-release strips, and ensure your bathroom is perfectly dry during application.
If you do find yourself facing a stubborn hook that refuses to release cleanly, do not forcefully rip it off.
Instead, use a hairdryer on a low heat setting to soften the glue, and use a piece of waxed dental floss to gently saw behind the hook. For comprehensive rescue methods, consult a professional guide on removing adhesive from drywall before resorting to brute force.
Conclusion: Final Thoughts on Drill-Free Bathroom Organization

Upgrading your rental space shouldn’t cost you your security deposit. By strategically utilizing drill-free bathroom storage like vertical tension rods, silicone mirror organizers, and over-the-toilet shelving, you can create a highly functional, organized oasis out of the smallest footprint.
If you found these space-saving organization tips helpful, please share this article with your fellow renters!
Let’s examine the actual cost-to-benefit ratio of these temporary upgrades. The average apartment security deposit ranges from one to two months’ rent, representing a significant chunk of your personal savings.
A single improperly removed heavy-duty adhesive hook or a poorly drilled drywall anchor can result in a harsh deduction of $50 to $150 per patched hole when your landlord conducts the final walkthrough.
Conversely, investing in premium drill-free bathroom storage systems—such as a rust-resistant tension rod or a sturdy bamboo over-the-toilet rack—typically costs between $30 and $100 upfront.
Crucially, these items travel with you to your next apartment, offering a lifetime return on investment. You are essentially purchasing modular, adaptable furniture rather than risking a permanent structural alteration to a property you do not even own.
To ensure your bathroom upgrade remains truly damage-free from the day you move in to the day you pack up, always follow this final strategic sequence:
- Assess the Environmental Surfaces First: Never guess what your walls are made of. Run your hand over the tile, glass, and drywall. Smooth, non-porous surfaces (like glass enclosures or perfectly glazed ceramic tile) are the only safe zones for specialized adhesives. Matte-painted drywall is strictly off-limits for sticky mounts and should be reserved entirely for freestanding furniture or padded over-the-door brackets.
- Measure Meticulously Before You Buy: Do not eyeball the clearance for an over-the-toilet rack or a narrow rolling cart. Measure the exact gap between the vanity cabinet and the toilet base, and double-check the height of your rear water supply valve. A mere half-inch miscalculation renders a rolling cart entirely useless and forces you to deal with annoying return shipping.
- Choose Compression Mechanics Over Suction: Whenever dealing with the heavy, wet environment of a shower cubicle, always prioritize mechanical tension rods over vacuum-seal suction cups. The daily temperature fluctuations of a hot shower will inevitably expand and contract the air inside a suction cup until it fails, whereas a heavy-duty steel tension spring remains structurally unaffected by steam and moisture.
- Strictly Enforce the 24-Hour Curing Rule: If you do utilize specialized adhesive strips on safe, non-porous surfaces, the curing time is absolutely non-negotiable. Clean the application area with rubbing alcohol, press the strip firmly for a full 60 seconds to eliminate microscopic air bubbles, and absolutely wait a full 24 hours before adding a single ounce of weight. Bathroom humidity requires this extended time for the chemical bond to fully set.
- Remove Organizers with Extreme Patience: When your lease ends and it is time to move out, never forcefully yank adhesive strips or silicone pockets off the wall. Use a standard hairdryer on a low heat setting to gently soften the underlying glue. When pulling name-brand stretch-release tabs, pull them slowly and perfectly flush against the wall, never straight outward toward your chest.
Ultimately, a tiny apartment floor plan is not a life sentence to a cluttered vanity basin or a chaotic, slippery shower ledge.
By shifting your perspective upward to the vertical airspace and utilizing the correct temporary hardware, you can engineer a beautifully organized, stress-free morning routine without breaking a single clause in your lease agreement.